Anatomically speaking, the groins are the folds that mark the meeting of the lower abdomen and the inner thigh. In Iyengar yoga, those would be the inner groins. Iyengar yoga also identifies middle groins, outer groins, and back groins, making a circle of awareness all around the meeting place between legs and torso.
Lately, I’ve been somewhat obsessed with groins, nagged by intuition that if I could just understand better, go a little deeper, then I could unlock some new freedom in my body.
I’m not sure I’d go as far as Arthur Kilmurray, at Mystic River Yoga, who writes in his excellent article “Structure of the Groins”: “This region is of great importance for humans because its full extension creates the upright posture unique to our species. In a sense, when we are not balanced and stable through the groins in the upright posture, we are not fully human.” Kilmurray suggests that for freedom in the groins we learn to sit like a frog—squatting, that is.
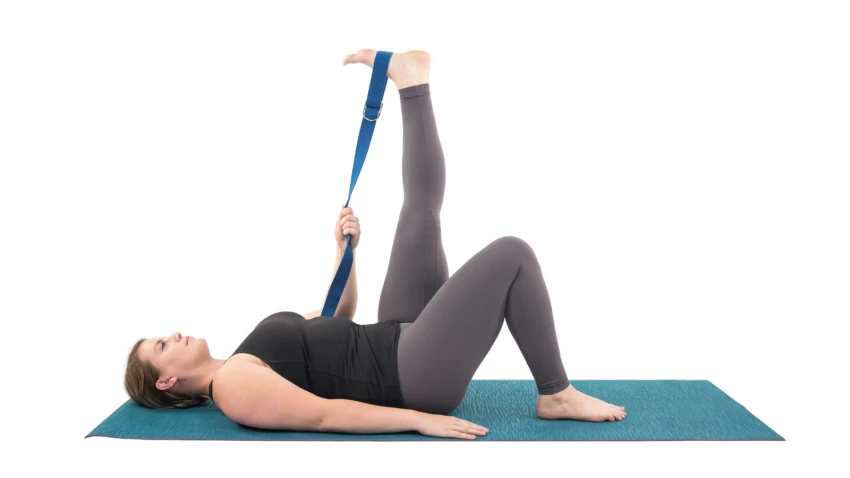
If you have difficulty squatting, it can be useful to gain more awareness of your groins before you start. A modification of Reclining Big Toe Pose (Supta Padangusthasana) with a strap at the hip crease can help familiarize you with your groins. The pose works to stretch your hamstrings and open your hip joints. Together, that spells better mobility and an easier walking stride. Using a strap leaves a memory in your body that will linger as you move into other poses.
And if you feel more fully human trying it, well, that’s all to the good, isn’t it?
How to Practice Yoga’s Supta Padangusthasana with a Strap
Two things I'd change about the picture below: keep the leg at 90 degrees, not higher. And keep the strap at the place where your heel meets the sole of your foot.
 Start by tying a loop in a long strap. Then, standing up, put your foot on one end of the loop and bring the other end to the top of your outer hip on the same side. You may need to adjust the size of your loop.
- Now lie on your back. If you can, be close enough to a wall that your feet press strongly into the wall when your legs are straight.
- Support the back of your head with a blanket, or towel, if needed, to relax your neck and shoulders.
- Take the loop around your left foot and your right hip crease. The strap will be slightly too long. As you tighten it, bring the buckle toward the large muscle at the outer hip. Make sure that the strap is firmly in your hip crease, and not around the top of your right thigh muscle. Make it snug.
- With your left leg straight, draw your right knee toward your chest. If the strap is tight enough, you will feel it eating into your hip crease. If it’s too tight, you won’t be able to draw your knee in; if it’s too loose, you won’t feel much of anything. Adjust the size of the loop so that you feel the strap in the hip crease, but you can still easily draw your knee in.
- On an exhalation, release the hip crease away from the strap, deeper into your body.
- Your lower back on the right side will feel longer, and your right buttock will draw toward the wall.
- Relax your face, relax your eyes. Hold for six to 10 breaths.
- Now take the second strap around your right foot. Straighten your right leg. Start at a 45-degree angle. Press your right big toe away from you. Pull your right front thigh down toward your hip crease. Push your right thigh bone from the front (quadriceps) side to the back (hamstrings) side.
- Now press the big toe of your lower leg into the wall. Pull your front thigh muscle toward your hip crease, and press the lower leg’s thigh bone to the floor. Slowly draw your right foot toward you. Bring your right leg to 90 degrees.
- With every exhalation, sink your right hip crease away from the strap. Relax your face and eyes. Hold for six to 10 long slow breaths.
- Release the strap. Repeat on the left side.
- When you’ve worked both sides, draw your knees in toward your chest. Feel the hip creases sink as you exhale.
- If you only have five minutes, stay two minutes on each side. Then, over the next few hours, notice the sensations in your hip creases.
A Longer Practice to Stretch Your Inner Groins
- If you have time for a longer practice, come into Child’s Pose (Balasana), working your hip creases back toward your heels.
- Then keeping your awareness in your hip crease, come into Downward Facing Dog Pose (Adho Mukha Svanasana), and then Standing Forward Bend Pose (Uttanasana). In each pose, take the middle groins deeper into your body; roll the inner groins toward each other, and the outer groins toward the wall behind you.
- If your hamstring stretch is too intense, back off and take your raised leg lower. If you can’t relax your face and shoulders, try more height under the back of your head.