Starting a longer practice while lying on the floor is my favorite way to go. But starting from a sitting position is a close second. This is especially true first thing in the morning if, after just getting out of bed, I don’t want to lie back down again. So if you’re practicing in the morning or planning morning classes, this seated warm-up might be a particularly good way to start.
Sometimes we may feel mentally fatigued in an early evening practice. A seated warm-up helps you maintain mental alertness at the start of your practice. I also find that changing the starting position for a practice as a form of variability is also more mentally engaging, as opposed to always starting your practice on your back, for example.
Warming up in a seated position is also very useful when reclining warm-ups are difficult because of a physical condition. Lying down can be challenging due to minor issues, such seasonal head colds and sinus infections. More significant issues, such as active gastroesophageal reflux (GERD) or some types of vertigo can worsen when you lie on your back.
How to Stay Aligned in a Seated Warm-Up
The sequence I’m presenting today combines both dynamic seated mini-vinyasas and seated static poses. It does a nice job warming up your spine, hips, and shoulders for an active practice. This could be short stand-alone practice as well.
While many of us spend a good part of each day sitting in a chair, sitting on the ground can be challenging. One of the key aspects of any appropriate sitting practice is getting the right amount of propping under your hips. This is especially important if you have a lot of tightness in the legs, hips and lower spine. So, although you could do the entire sequence with just your mat underneath you, feel free to sit up on a folded blanket, a block, or even a bolster. This can help you to maintain a more neutral arch in your lower back.
If you want to make this sequence a bit shorter, try these modifications:
- Consider doing the first pose for only one minute
- Doing pose number 3 once
- Skipping the static version of pose number 6.
Dynamic and Static Seated Warm-Up
1. Hero Pose (Virasana), Any Version, 1 to 5 Minutes
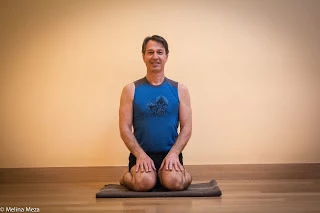
This is my personal favorite pose in which to meditate. If your legs, knees, and hips do well with it, it’s a great position for starting a sitting practice. However, if your legs, knees, or hips cause pain in this pose, please practice Sukhasana (Easy Pose).
Come into any version of Hero Pose that feels comfortable for you and allows for you to sit with a neutral arch in your lower back.
From here, take the time to become centered by tuning in to how your body feels at the start of your practice and how your breath is flowing. Feel free to set an intention for your entire practice.
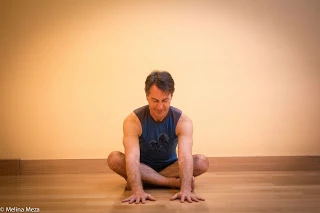
2. Cat-Cow Pose (Seated Marjarasana) in Hero Pose, 6 Rounds
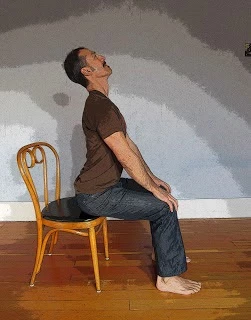
Cat-Cow is a gentle way to start moving the joints of your spine and hips.
While in Hero Pose (not in a chair), do six rounds of Cat-Cow, as you would if seated in a chair, ( shown above) moving your spine and hips with your breath. You can also practice Cat-Cow in Sukhasana if Virasana doesn’t work for you.
3. Arms Overhead Pose, Version 3 (Bound Hands) in Hero Pose, 30 to 60 Seconds, Twice
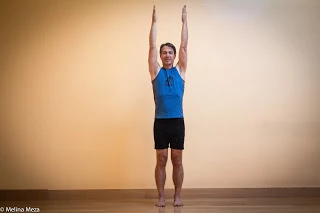
Even in a seated position, Urdva Hastasana (Arms Overhead Pose) is a wonderful pose for stretching and strengthening your upper back, shoulders, and arms, and the bound version stretches your wrists and forearms as well.
- Interlace your fingers, press your palms towards the floor, and on an inhalation sweep your arms up alongside your ears, pressing your palms toward the ceiling.
- After 30 to 60 seconds, exhale and release your arms.
- Change the cross of your fingers and repeat on the second side for the same amount of time.
- When you are finished with all the versions of Hero Pose (or Easy Pose), tip forward onto your hands and knees for a few breaths. Stretch one leg back, with toes on the floor, to stretch your knee and calf area and repeat with the second leg.
4. Dynamic-to-Static Easy Sitting Side Bend (video below)
This pose opens up the sides of your waist, ribcage, and arms. Start by coming into any version of Easy Pose that works for you. Be sure to place some folded blankets under your hips to elevate them if your lumbar spine is rounded and your pelvis is tilted back.
First, practice the dynamic version of this pose:
- Sit in Easy Pose with your right shin in front. Make sure you place a folded blanket under your hips so that you can sit easily with a relaxed, upright spine.
- Place your fingertips on the floor a few inches from the outsides of your hips.
- On an inhalation, extend your arms straight out from your shoulders, and then, on an exhalation, bend to the right, placing your right hand on the floor.
- As you inhale, return to the center. Lower your fingertips to the floor on the outsides of your hips. This is one round.
- On an inhalation, raise your arms to shoulder level. On an exhalation bend to the left, and on an inhalation, return to the center.
- Then on an exhalation bend to the right. On an inhalation return to the center and lower your fingertips to the floor again. This is your second round.
- Take a few more rounds and then repeat the sequence with your left shin in front.
- Then, practice a static version of the pose for 30 seconds on each side.
- With your right shin in front, come into the side bend to your right side, with your right hand on the floor about 6-12 inches from your hips and your left arm reaching up and over to your right as your torso side bends a bit to the right.
- After 30 seconds, return to upright, switch your left shin to the front, and repeat the side bend to the left.
5. upward Plank Pose (Urdva Mukha Phalakasana), Version 2 (Prep Pose), 30 to 60 Seconds
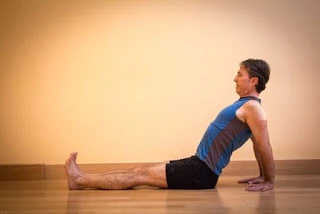
This seated backbend is a good warm-up for backbends if you are including those in your practice and in general, helps open your chest, which is beneficial for other seated poses, standing poses, and more.
6. Dynamic to Static Easy Sitting Twist

This pose is an excellent way to bring some rotational movement into your spine, which improves spinal range of motion, flexibility, and strength.
Start by coming into Easy Pose. Next practice the dynamic version of Easy Sitting Twist for six rounds:
- Twist to the right on the exhalation and return to the center on the inhalation. Then twist to the left as you exhale and return to center as you inhale. This is one round.
- Go back and forth a twice, in rhythm with the breath.
- Then move to the left first on the exhalation and back to the center on the inhalation, and then move to the right and back to the center.
- Then come into static Easy Sitting Twist, relaxing and breathing, for 30-60 seconds, moving first to the right and then to the left.
7. Easy Sitting Pose, Version 4 (Forward Bend), 30 to 60 Seconds, Twice
This pose invites more mobility and flexibility into your hip and spinal joints, relieving stiffness in those areas.
Start with your right shin in front of your left and come into the pose. Stay for 30-60 seconds. Then, come up, move your left shin in front of your right and come into the pose for a second time for 30-60 seconds.
8. Boat Pose (navasana), Version 2 (Hands on the Floor), 30 Seconds, Twice
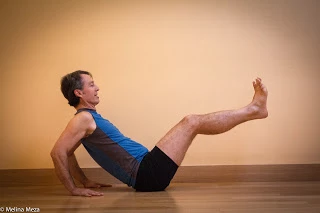
This pose builds strength in your core and front leg muscles.
This version is good for new practitioners who are just learning the pose, for those who are out of shape or recovering from an illness that has left them fatigued, or for those with balance issues. It is also a good place to start for those with back problems, as it is much easier on the back.
- Start with your knees bent and feet on the floor. Place your hands on the floor alongside your hips.
- Now, walk your hands about a foot or so behind you, bending your elbows backward a bit, and lean your torso back about 30-45 degrees, keeping your head balanced over your shoulders.
- On an exhalation, swing your shins up to parallel with the floor, keeping your legs either together or just slightly apart.
- Stay for 6 to 8 breaths. As you build strength over time, you can work up to staying for a minute.
- To come out of the pose, simply bend your knees and bring your feet down to the floor while walking your hands forward and bringing your chest up to vertical.
- Repeat if desired.
After you’ve finished, stretch your legs straight out on the floor and roll your legs side to side before transitioning to the rest of your practice.