4 Easy Ways to Use a Sandbag in Yoga Practice

B.K.S. Iyengar is credited with introducing props into modern yoga as a means of support within the asanas or yoga poses. Some yoga students may see using a prop as cheating. But a prop is nothing more than a tool to help you meet your body where it is on the yoga mat. A yoga prop can help you find ease and stability in a yoga pose, which can then help your muscles release and relax. Sandbags are less well known in yoga practice than blocks, straps and bolsters. But using a sandbag in yoga practice can add weight and stability.
Why Use A Sandbag in Yoga Poses?
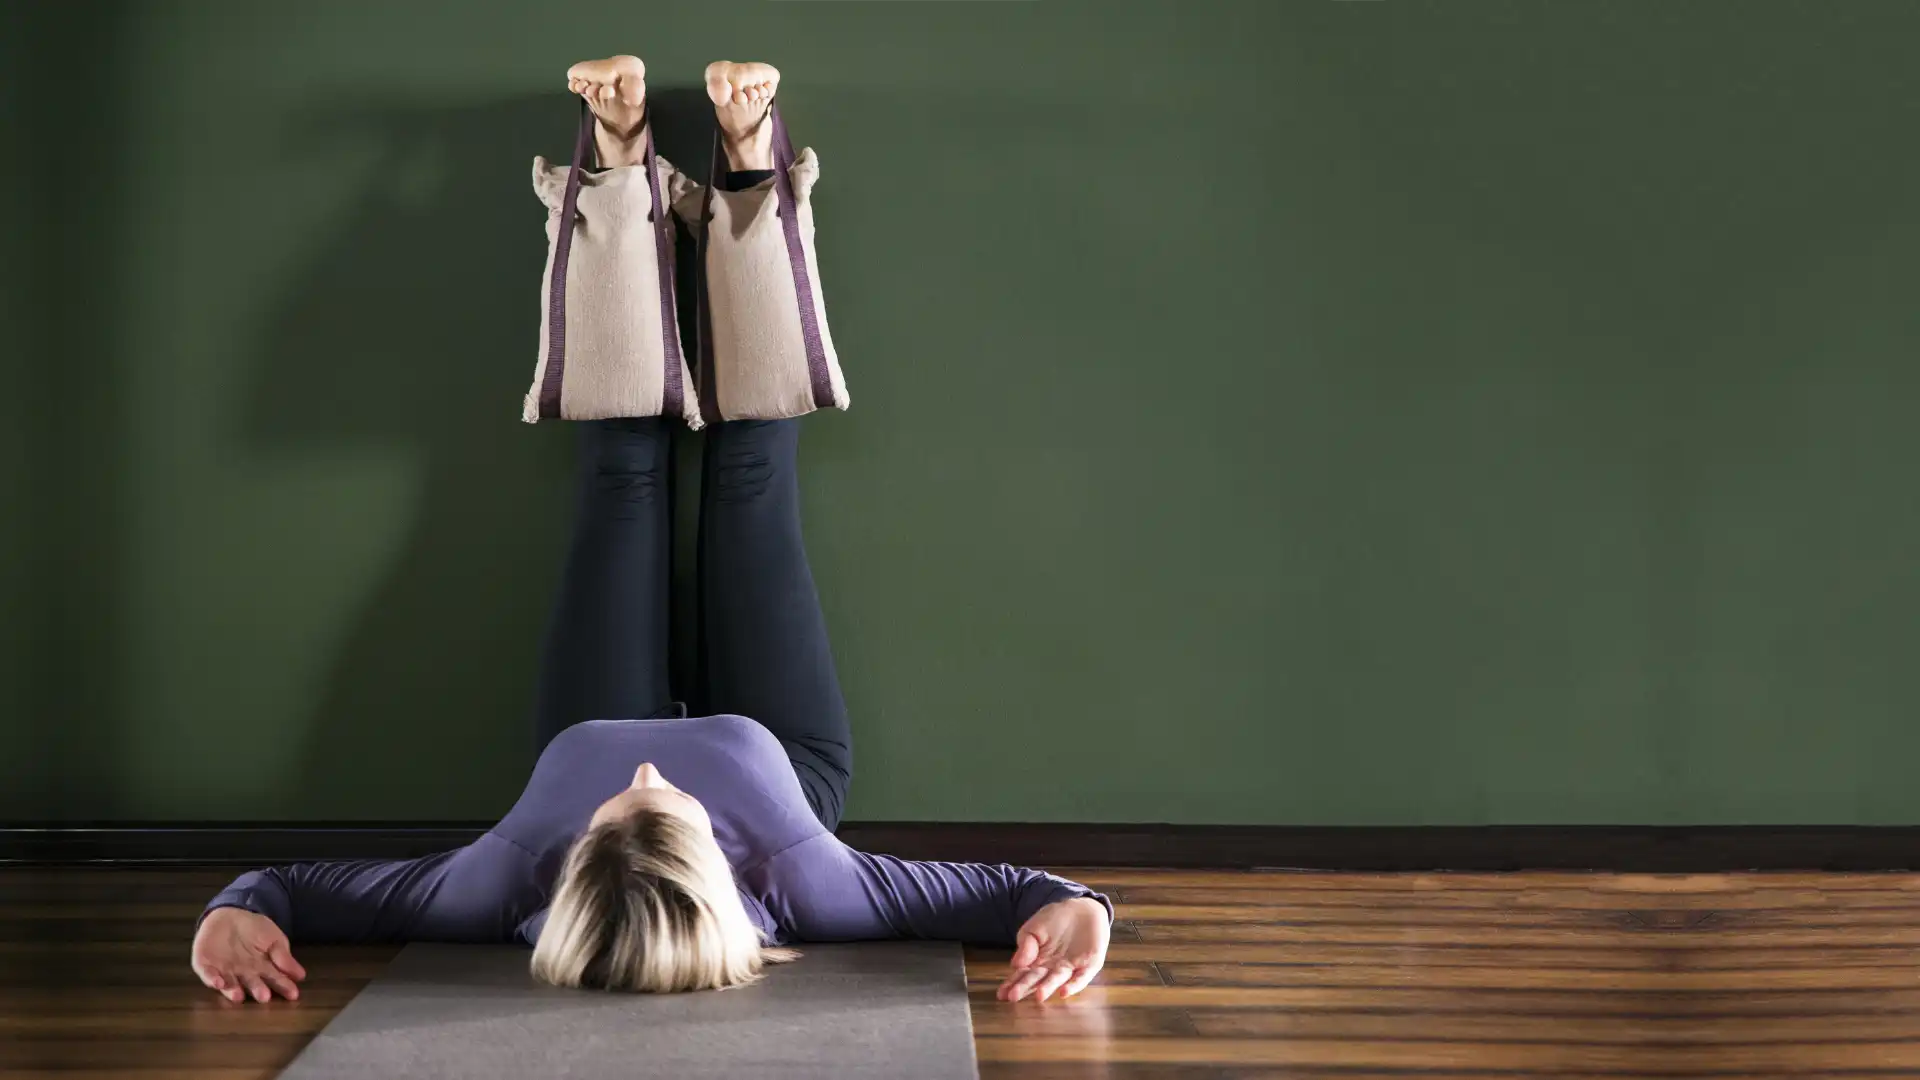
A yoga sandbag is similar to the weighted blankets that are very popular right now, but they are much smaller and weigh between seven to ten pounds. Weighted blankets and sandbags both provide deep pressure, which can help activate the parasympathetic nervous system to help you relax and feel less anxious.
Sandbags help activate the relaxation response, allowing you to sink deeper into a yoga pose. The additional pressure may help diffuse feelings of anxiety and sensory overload. Sandbags also stabilize hypermobile joints and provide a soothing “hug” to your overworked body and mind.
You can buy prefilled sandbags or make your own. If you make your own, fill them with newly purchased playground sand, dried beans, or even pea gravel. Just be sure to stay environmentally friendly and never take sand from the beach or an existing playground.
When filling your sandbag, leave some room within the bag. This makes the bag more malleable and easier to maneuver to fit your body.
Make sure your sandbag cover is made from a durable, coated fabric. The coating helps prevent dust from leaking out.
You can add your favorite essential oil to the sandbag for a soothing touch. Always ask your yoga students if they prefer a scented or unscented sandbag, as some smells can trigger headaches.
How To Use a Sandbag In Your Yoga Practice
Sandbags can be used in just about any Restorative Yoga pose. However, the additional weight can cause undue stress on joints or overly tight soft tissue areas if not used mindfully. Therefore, care should be taken when properly placing the sandbag.
- When the sandbags are placed on your thighs, as in Supta Baddha Konasana (Reclining Bound Angle Pose), be sure your knees are either on the same plane as the hips or only slightly higher than the hips.
- A sandbag on the lower back should be placed horizontally, with the center of the long edge of the bag along your sacral region and the shorter side of the bag toward your hips.
- Avoid placing sandbags directly on your knees.
- When placing a sandbag on the shoulders, as in a supine twist, be sure the shoulders are no more than about an inch off the ground. If the shoulders are too high from the floor, the sandbag could cause stress to the ligaments and tendons supporting the shoulder joint.
- If at any time a joint feels stressed or like it’s being pulled, remove the sandbag.
4 Simple Ways to Incorporate a Yoga Sandbag in Your Asana Practice
1. Increase Shoulder Mobility with a Yoga Sandbag: Simple Standing Shoulder Stretch
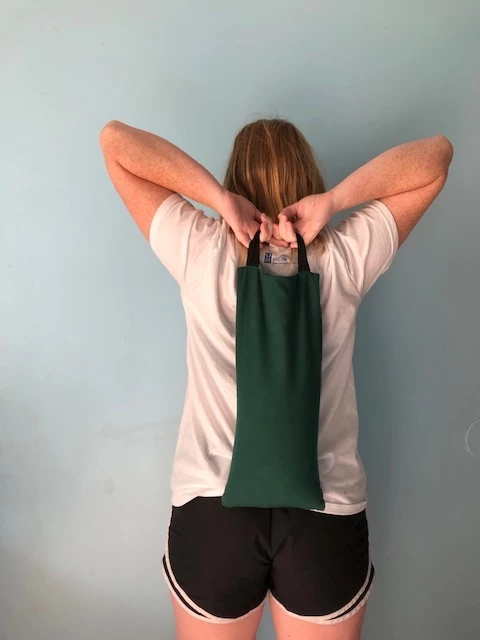
Sandbags are most often used in Restorative poses, but they can also be used in active poses for additional support or to increase a stretch, as in this standing shoulder stretch. The addition of a sandbag here is a great opener for the shoulders, triceps, armpits, and upper chest.
- Standing tall in Tadasana (Mountain Pose), hold the sandbag with both hands overhead.
- Carefully bend your elbows as if doing a triceps stretch, allowing the bag to hang below and between your shoulder blades.
- Hold the sandbag handle with both hands while you take ten slow deep breaths or until you are comfortable.
- When ready to release, engage your pectoral muscles to lift the sandbag overhead and then lower the sandbag to the floor.
2. How to Practice Child’s Pose (Balasana) with a Yoga Sandbag
You’ll need a friend’s help to place the sandbag in this Child’s Pose variation, but the extra stretch in your hips and lengthening of your spine will make this pose feel even more restful than usual.
- From Bharmanasana (Tabletop Pose) on your hands and knees, slightly widen your knees into a V shape.
- Extend your hips back toward your heels, taking your knees wider if you need more comfort for your knees or your belly.
- Have a friend or yoga instructor place the sandbag across the width of your lower back on the sacral region of your spine.
- The sand should be evenly distributed in the bag across the width of your back.
- The more time you can allow for intentional breathing in Child’s Pose, the deeper relaxation you’ll feel in your lower back and hips.
- Bring your hips forward again to come out of the pose, either lying flat on your stomach or moving back to the Tabletop Pose.
3. Practice Reclining Big Toe Pose (Supta Padangustasana) with a Yoga Strap and Yoga Sandbag
While Reclining Big Toe Pose is great for stretching the hips, hamstrings, and calves, it can also strengthen the knee joint. Many yogis report finding relief from back pain in this pose.
Adding a sandbag to the hip of the leg opposite the one stretching will help keep the pelvis steady in the pose.
- From a supine position, bend your right knee, drawing it in toward your chest. Place the yoga strap on the ball of your right foot.
- Pushing outward through your right heel, extend your right leg to whatever angle allows your knee to be straight. Your right leg does not have to be vertical. Find an angle that will enable you to feel a stretch in your hamstrings but also allow you to keep the rest of your body in a relaxed, neutral position. Be mindful of your body’s limits and only go as far as you feel a comfortable challenge.
- Hold the strap with your right hand as you place the sandbag on your left hip so that the hip feels grounded and stable.
- Keep your left foot flexed and active.
- When ready, hold the strap with both hands, being sure not to cause stress or strain in your upper body by holding the straps too tightly.
- Take 5 to 10 deep breaths. Release, and then repeat on the left side.
4. How to Use a Yoga Sandbag in Reclining Twist Yoga Poses: Revolved Belly Pose (Jathara Parivartanasana)
Also known as “supine twist,” this restorative pose reduces spine, hips, chest, and shoulder stiffness. It can also reduce stress and anxiety. However, those with stiff shoulders may be uncomfortable if the shoulder pops up off the mat.
Carefully placing a sandbag on the shoulder joint can gently encourage opening in the shoulder and allow for a more comfortable rest against the mat.
- Lying on the mat on your back with your knees bent, place your arms out to the side in a T shape. If that’s not comfortable, try placing the arms into a goalpost shape (also known as Cactus Arms).
- Drop both knees to the right as you turn your head to the left.
- Gently place the sandbag completely over the left shoulder, draping the sand evenly over the joint. This will allow for soft pressure rather than forcing the joint down.
- Stay here for as many breaths as time allows.
- Lift the legs back to vertical. Repeat on the other side.
Also, read...
In Celebration of Gray-Haired Yoga – Busting the Myth of the Yoga Body
Dec 12 – Charlotte Bell
Stand Firm: 6 Easy Balancing Moves for Your Daily Yoga Routine
Dec 06 – By: Olga Kabel
Related courses

Jennifer Williams-Fields E-RYT 200 is passionate about writing, yoga, traveling, public speaking and being a fabulous single momma to six super kids. Doing it all at one time, however, is her great struggle. She has been teaching yoga and writing since 2005, and she has been teaching since she first picked up a crayon. Although her life is a sort of organized chaos, she loves every minute of the craziness and is grateful for all she’s learned along the way. Her first book “Creating A Joyful Life: The Lessons I Learned From Yoga and My Mom” is now available on Amazon. She has had her essays featured on Yahoo! and Dr. Oz The Good Life. She is a regular writer for Elephant Journal Magazine, Your Tango, and YogaUOnline. See more from Jennifer at jenniferwilliamsfields.com
Recent articles
In Celebration of Gray-Haired Yoga – Busting the Myth of the Yoga Body
Dec 12 – Charlotte Bell
4 Yoga Poses to Help Ease High Blood Pressure
Dec 08 – Stanley Clark
Categories
Tags
Upcoming courses
Reconnecting with Strength: Your Path to Building Greater Inner Resilience
With Arielle Schwartz
Recent articles
Almost there...
Sorry, we couldn't find anything...
Yoga Practice Tips
In Celebration of Gray-Haired Yoga – Busting the Myth of the Yoga Body
I found my first grey hair when I was 22. It wasn’t completely shocking.…
Dec 12 – Charlotte Bell
Yoga Practice Tips
Judith Hanson Lasater on The Art of Teaching Yoga: Making Every Movement an Asana
Judith Hanson Lasater is one of the longest-teaching yoga teachers in the U.S. In…
Dec 09 – By:
Blood Pressure
4 Yoga Poses to Help Ease High Blood Pressure
Approximately 46 percent of Americans have high blood pressure, based on the American Heart…
Dec 08 – Stanley Clark


