Ah, Pigeon Pose. It seems to be included in about nine out of ten yoga classes. As a teacher, if I don't cue it, I’ll see students trying to squeeze it in (if I offer time for any additional poses before Savasana). A student has even asked me why I didn’t cue it.
Practicing Eka Pada Rajakapotasana (One-Legged King Pigeon Pose), yields a significant stretch for various muscles and muscle groups, such as the glutes, iliopsoas, and other soft tissue surrounding the hip joint. Habitual sitting can cause these muscles to become tight. This can often lead to surrounding areas becoming cranky (read: discomfort and pain in areas such as the back and hips).
All of this can often only get worse when combined with quick bouts of high-intensity exercises—such as sitting at work all day to then doing an hour at the gym or taking a long run. Perhaps this is why so many teachers teach Pigeon Pose, and why so many students want it (to which there could be a bit of a chicken-or-egg question). Students sense that their bodies need it, it feels good for them when they practice it, and teachers have some sense of both.
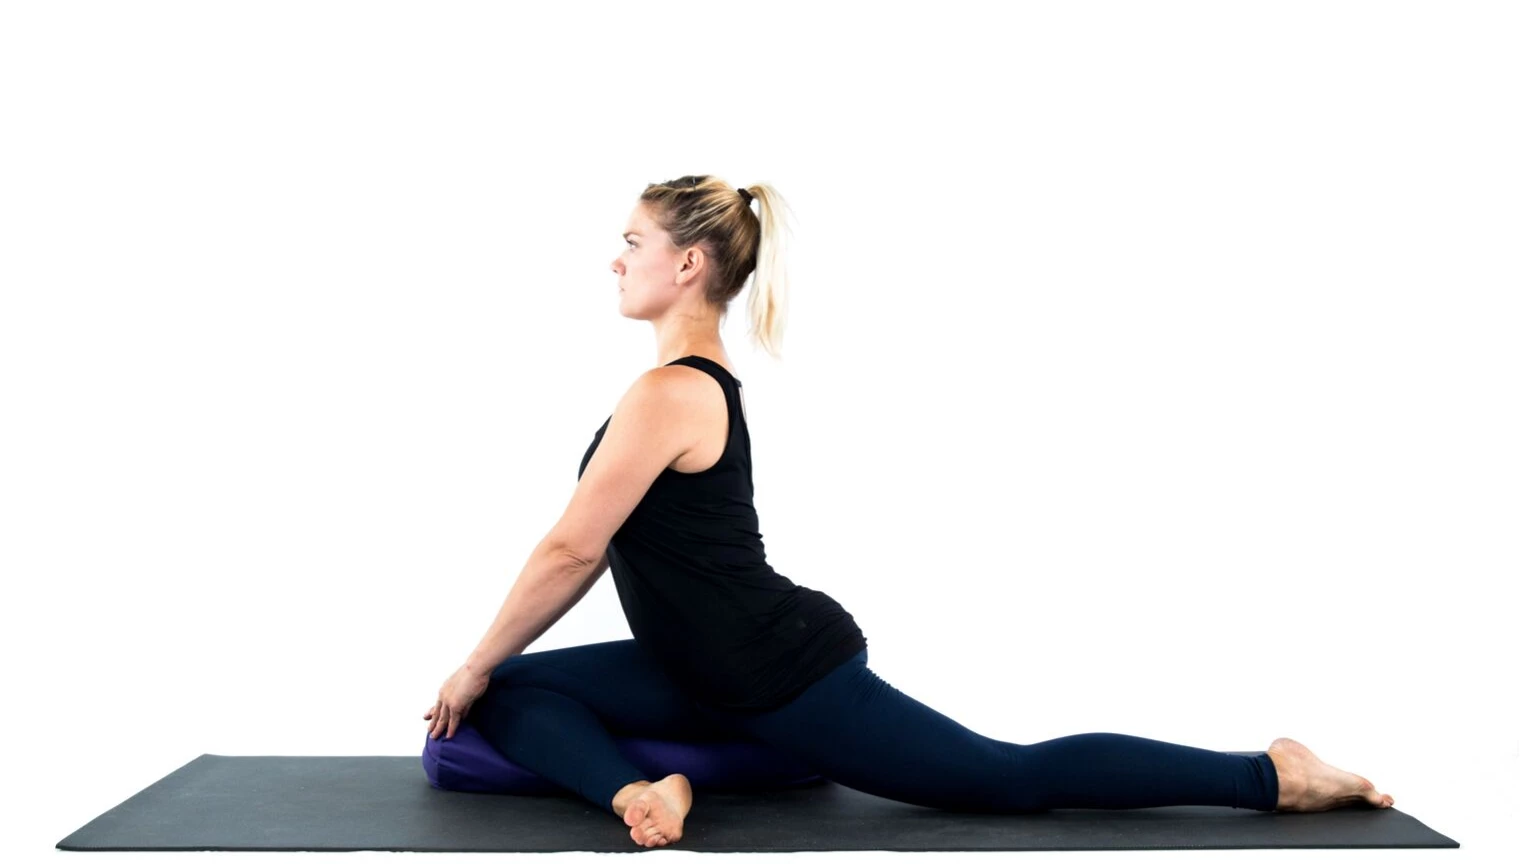
The Problem with Pigeon Pose (shown below with a common misalignment)

Yet the pose may not actually be anatomically safe and smart yoga practice for some students, arguably, for many yoga students. Because of the weight of the torso over the front leg, it places a good amount of pressure on sacroiliac, hip, and knee joints. If these joints are structurally capable of reaching the amount of external rotation, abduction, and flexion (or FABER, for short) that the pose requires, then that pressure may not be problematic. The reality is, however, that a significant part of the general population taking group yoga classes doesn’t have that amount of FABER structurally accessible in these joints.
What happens then, for those practitioners? There can be acute injury (significant damage happening at once), or gradual wear and tear on these joints that could lead to notable damage over time. For instance, Ginger Garner, MPT, ATC, PYT, shares how she’s seen an increase in preventable back and pelvic injuries amongst yogis, whilst the emphasis on hip-opening in the yoga world only grows.
Correlation doesn’t equal causation, of course, but that sort of thing can—and perhaps should—give one pause. True, I do indeed teach many students who seem to crave the posture and even others who directly ask for it. Yet other students say that it’s uncomfortable or even painful for them. That’s their body asking for an alternative.
Some yoga practitioners, such as those who’ve had knee surgery or hip replacements, should avoid the pose entirely. Others can use props to avoid potential joint damage (in effect, making up for the lack of FABER needed to safely do the pose). Together, the below Pigeon Pose modifications and alternatives allow any kind of yoga practitioner to get the benefits of the posture without its potential harms. They can be beneficial to have on hand in mixed-level yoga classes.
In a wider view, if we truly practice or teach with the yogic value of ahimsa (non-harming), we won’t practice or cue certain poses just because everyone else is doing it. We’ll do what’s wisest for ourselves or our students. We’ll work toward balance and health, rather than an idea that may or not be possible for us given the bodies that we (or our students) were born with.
Blanket-Supported Pigeon Pose

This pose is appropriate for those without hip replacements or knee surgeries.
The blanket here serves to protect the knee joint. It also protects the hip and sacroiliac joints by helping to create the FABER that the pose requires, and thus helps avoid straining these joints. (shown above with bolster replacing blankets)
- From its “storage fold” (folded in quarters), fold a yoga blanket into another half. Place it on the upper right-hand side of your mat.
- From Adho Mukha Svanasana (Downward-Facing Dog Pose), draw your right knee toward your chest, swing the whole body forward and then lay the knee, thigh, and hip on the folded blanket so that they are elevated. Your right shin should angle toward the left side of your mat.
- Lay your left leg down onto the mat, parallel to the length of it.
- Alternatively, if you prefer, start in Bharmanasana (Tabletop Pose) and draw your right knee forward and bend it to have your right lower leg lay across the mat, without coming from Downward-Facing Dog. Either way, ensure that the blanket also supports the top of your right shin (in other words, the top of your right shin lies on the blanket).
- Breathe in to grow tall through your spine. On your breath out, lay your torso along your front leg, laying the lower belly down first.
- Make any small adjustments you may need to avoid any notable discomfort. If you’re experiencing any sharp pain, particularly in one specific area, it may very well be best to come out of the pose and instead practice Supta Ardha Padmasana (Reclining Half Lotus Pose), as described below.
- Breathe here for 5 to 10 breaths. Notice any tension in particular areas in your body. Bring breath into those areas as you inhale, and see if you may sense that tension releasing as you breathe out.
- Practice the pose with the left leg in front, following steps 1 through 5 (with step 1, simply shift your blanket to the other side of the mat). Because the sides of our bodies can be quite different, an alternative pose might be better for the other side of your body (particularly if you have a history of injury on that side).
Supta Ardha Padmasana
 This pose is good for most practitioners, often inadvisable for the notably pregnant without additional prop support.
- Lying on your back, beginning with both feet planted on your mat, cross your right shin just above your left knee (avoid putting direct pressure on your front knee).
- To increase the feeling of a stretch here (if you desire that—you may already be experiencing a lot of sensation), use your right hand to push your right thigh away gently.
- A more rigorous, less restful variation of the pose is to clasp your hands around the back of the left thigh (threading the right hand through the opening behind the right knee) and lifting the left foot off the ground). More rigorous still is to clasp hands around the left shin (again, not on the left knee—avoid direct pressure on the knee joint). Follow your body’s signals to know what variation of the posture is right for you.
- Breathe here for 5 to 10 breaths. Notice any tension in particular areas in your body. Bring breath into those areas as you inhale, and see if you may sense that tension releasing as you breathe out.
- To release the pose, place the right foot back on your mat. Then “wash” the pose out, releasing your back and legs, by letting your knees fall side-to-side—like a windshield-wiper at work—for a few breaths.
- Practice the pose with your left ankle crossed just above your right knee, following steps 1 through 5. As with the last pose, because the sides of our bodies can be quite different, another variation of the pose might be better for the other side of your body (particularly if you have a history of injury on that side).
Want more information on this topic? Study Hip Preservation with YogaUOnline and Dr. Ginger Garner: Save Your Hips: Asana Evolution for Hip Preservation.
Study core strength with YogaUOnline and Staffan Elgelid – Yoga for Core Integrity: Getting an Edge With the Smart Core System.