Yoga teachers often talk about psoas release, but what truly does that mean? You may not think about this while you're practicing yoga, but deep within the center of your body, beneath layers of skin, muscle, and organs, lies the psoas (pronounced “so-as”). It is the deepest of your core muscles—the very core of your core.
You actually have two psoas muscles, one on each side of your body. Each begins at your 12th thoracic vertebra, attaching there and to each of the five lumbar vertebrae below. It then connects and blends with the iliacus muscles that line the insides of your pelvic bones, and then extends over the front of the pelvis and attaches to the lesser trochanter of the femur, a “knob” on the inner upper thighbone.
The Function of the Psoas
While the psoas is often grouped with the hip flexors, that classification doesn’t give an adequate sense of the many ways in which this key core muscle maintains your physical, mental, and emotional equilibrium.
As the only muscle that connects the spine with the legs, the psoas creates a bridge between your upper and lower body. This bridge allows your body to move fluidly while you walk by guiding the transfer of weight from the trunk into the legs and stabilizing the spine while the legs move.
The psoas also provides a shelf for your abdominal organs. When you walk, the psoas and diaphragm work in harmony to massage the spine and the organs, blood vessels, and nerves of the torso.
Intrinsically connected with the sympathetic nervous system, or “fight-flight-freeze” response, the psoas responds to danger by flexing the body to prepare to fight an attacker, sprint away, or curl into a protective fetal position.
This reflex came in very handy for our cavemen ancestors when they dealt with life-threatening situations like confronting a hungry lion. Twenty-first-century daily life rarely requires these intense reactions. Even so, the body still instinctually responds in the same way to modern stressors like job insecurity, money troubles, or rocky relationships.
If you experience high levels of stress on a regular basis, it’s very likely your fight-flight-freeze response is constantly switched on, which signals your psoas to contract constantly. When the psoas is chronically contracted, it can no longer do its job of maintaining our structural and emotional integrity.
Psoas Health: Yoga Poses to Release & Lengthen the Psoas
To perform most effectively, the psoas must be relaxed and supple. Sedentary lifestyles and sitting for long periods of time can shorten and weaken this important stabilizing muscle.
When the psoas is shortened, it throws the pelvis out of alignment. In turn, the muscles surrounding the pelvis are weakened and the psoas is recruited to do the jobs of those weak muscles, leaving it tight, tense, and exhausted.
A shortened or chronically contracted psoas can lead to pain in the hips, groin, knees, or back, anxiety, menstrual cramps, exhaustion, and immunity issues. It constricts the abdominal organs that rest upon it, which impairs the circulation of fluids and interferes with your ability to take a full diaphragmatic breath.
Below is a sequence of yoga poses that release and lengthen the psoas. By spending time in these simple, gentle poses, you’ll give the psoas the time and space required to relinquish tension and elongate.
One of the most important components of working with the psoas is somatic awareness or an awareness of what’s happening within your body. Yoga offers us a handy tool for developing this: the practice of Svadhyaya, or self-study. This practice of self-reflection and self-contemplation requires you to train your awareness inside yourself and to explore what’s happening within.
Relax and Restore: A Practice for Psoas Release
As you spend time in each of the following yoga poses, turn your attention inward. Can you actually sense where your psoas lives inside the core of your body? Feel whether it’s tight or loose, rigid or soft, tense or at ease. Notice whenever a sensation of surrender arises.
1. Psoas Release in Constructive Rest Pose
Optional props: blanket, pillow
-

Lie on your back with knees bent and the soles of your feet on the ground, parallel to one another and as wide as the fronts of the hip sockets. Place your heels about 12-16 inches away from your buttocks. As the name of the pose implies, rest is the intention here – so ideally, with your legs and feet placed like this, your leg, hip, and abdominal muscles can relax.
- If instead, it feels like a lot of effort to maintain this position, play around with moving your feet closer or farther from your buttocks until you find a placement that requires no effort. If you still feel like you need to engage your muscles to keep your legs in place, slide some support underneath your knees, such as a bolster or a stack of blankets. You could even rest your lower legs on a sofa or chair.
- Rest your hands on your ribs, belly, or hips, or simply on the floor beside you.
- If your neck muscles feel tense or scrunched, place a folded blanket or pillow underneath your head. Your forehead should be just slightly higher than your chin, and your neck should feel comfortable.
- Now that you’ve settled in, give yourself permission to relax and let gravity do the work for you. Allow your body to sink and release towards the ground.
- Stay here for 5 to 10 minutes. If you have the time to stay longer, do; the longer you stay, the more time you’ll give your body to surrender to gravity.
- With your body at ease and supported by the ground beneath you, you now have the perfect opportunity to practice Svadhyaya:
- Draw your attention inward.
- Scan slowly through your body and notice what draws your attention.
- Feel sensations as they arise, then watch as they fall away.
- Listen to the gentle ebb and flow of your breath.
- Observe how your body sinks down into the ground. Does any part sink more heavily than another? Do some parts feel lighter than others?
- Notice if this distribution of weight changes as you spend more time in the pose.
- As the minutes go by, take note of any shifts or changes in your breath, body, mind, or heart.
2. Windshield Wiper Pose
-

From Constructive Rest Pose, walk your feet wider apart and bring your knees together. Keeping your feet this wide, swipe both knees over to the left as you breathe out; on your inhale, bring both knees back to center. On your next exhale, swipe both knees to the right; and again, bring them back to center on your inhale.
- Swipe the knees back and forth slowly, moving to the rhythm of your breath. After you’ve done an equal number of swipes to each side, pause with the knees in center. Notice the effects of what you just did.
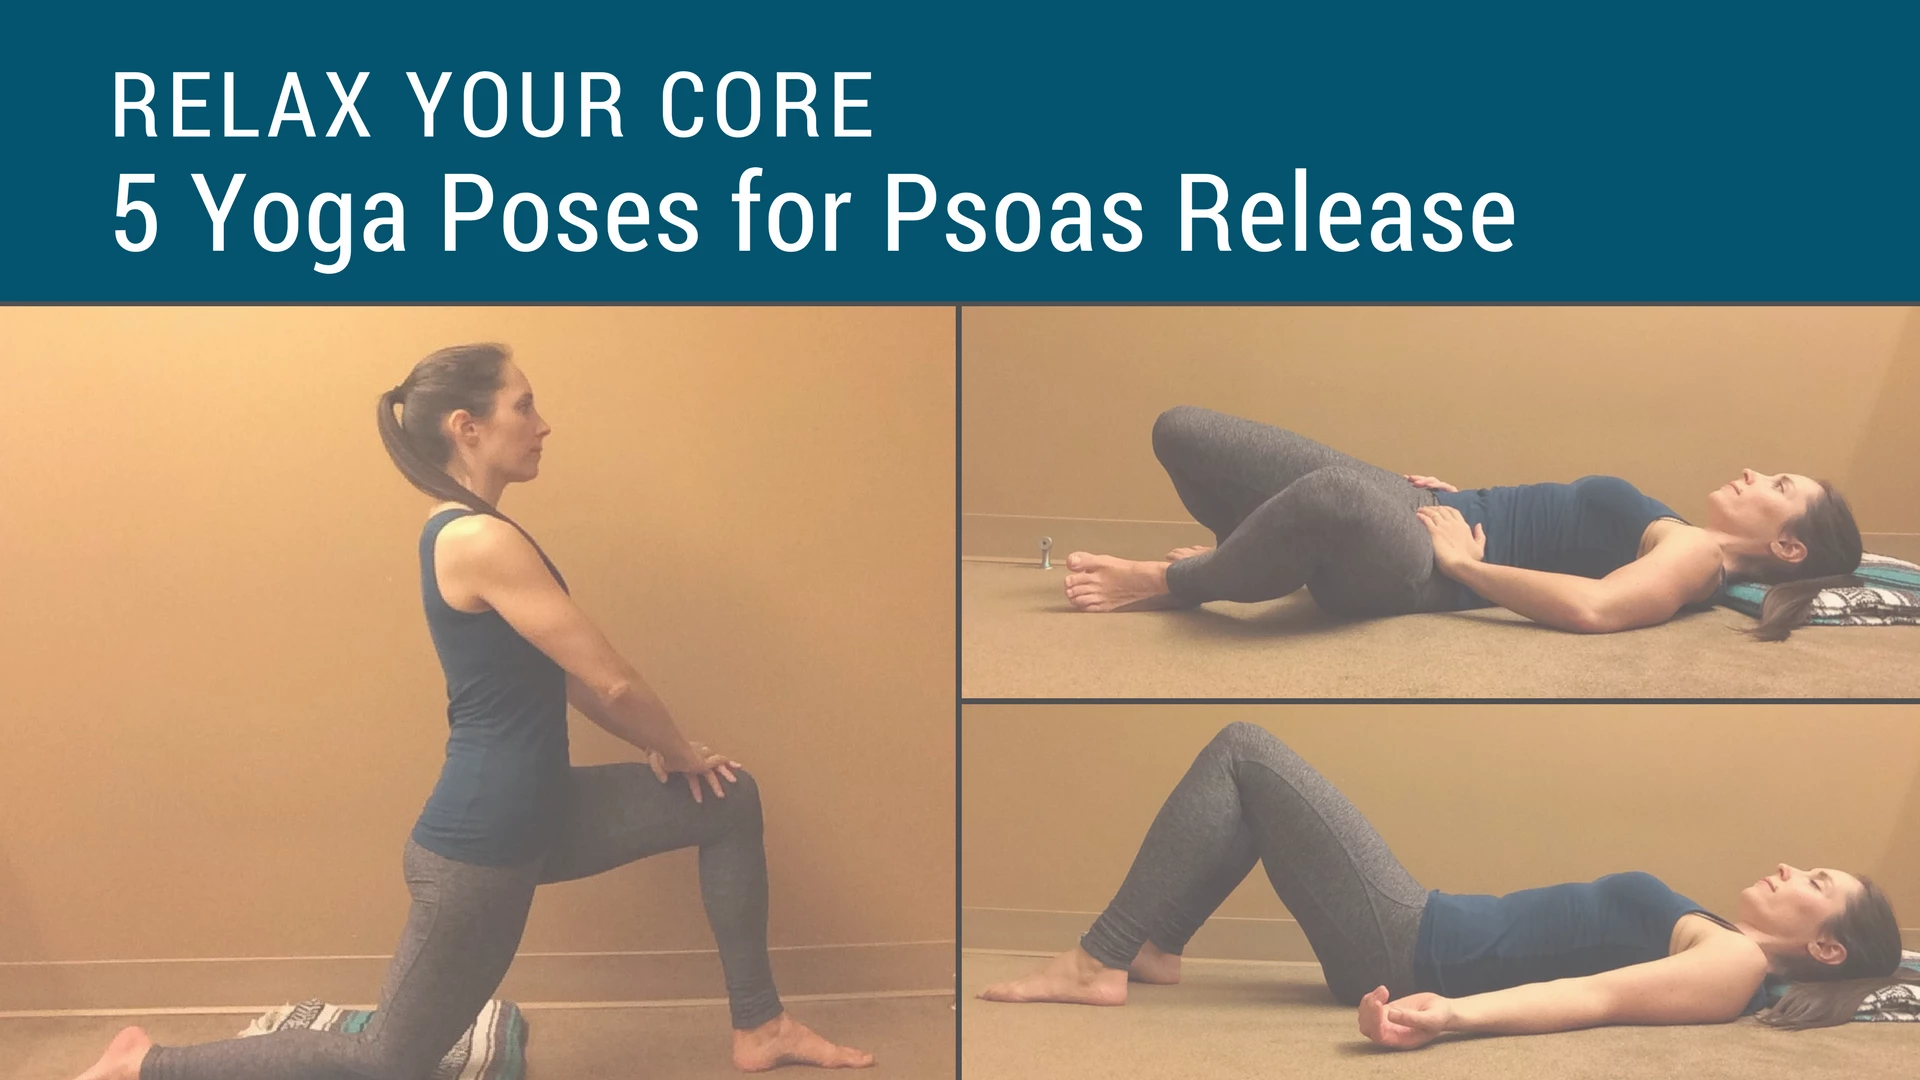
3. Psoas Release in Knee-to-Chest Pose (Apanasana)
-

From Constructive Rest Pose, gently draw your right knee towards your chest. Be sure to maintain your neutral pelvis and natural lumbar curve. If your lower back presses into the ground as you bring your right knee in, move the knee slightly forward. Soften the muscles that surround your right hip socket.
- To lengthen your left psoas muscle, slowly walk your left foot forward, away from the buttock. As the leg extends, bring your awareness to the front of the left hip. If you feel tension there, pause and focus on releasing that tension. Once the left leg is completely extended, continue to feel the front of the left hip, noticing any further release or melting that occurs.
- Stay for 5 to 10 breaths. Bend the left knee and return the right foot to the ground, then repeat to the second side.
4. Psoas Release in Low Lunge (Anjaneyasana)
Optional prop: blanket
-

Come onto your hands and knees, facing down towards the ground. If your knees are sensitive, place a blanket underneath them. Step your right foot forward, aligning the ankle directly below the knee.
- Stack your hands on top of your right thigh and press firmly down into the thigh to create a lift through the core of your body. Soften the front of your left hip.
- To create more length in the upper part of the left psoas, sweep your arms out and up overhead.
- Stay for 5 to 10 breaths, then bring your hands back down to the ground, step the right knee to the floor beside the left knee, and press your hips back towards your heels to come into Balasana (Child’s Pose). As you pause here, observe any differences between the right and left sides of your body. Then repeat the pose with the left foot forward.
5. Supported Bridge Psoas Release (Salamba Setu Bandha Sarvangasana)
Required prop: one block
-

Lie on your back in Constructive Rest Pose. Walk your feet closer to your buttocks until the ankles are directly under the knees. Place your hands and arms by your sides. Spread your feet and root evenly into them, at the same time pressing your arms and palms down. Lift your hips away from the floor and roll up through the spine.
- Once your hips are elevated, slide a block underneath your pelvis and rest your sacrum on it. The block has three heights: low, medium, and high. Choose a height that allows you to relax into the shape of the pose.
- With your pelvis supported by the block, you no longer have to work to stay here. This is another opportunity to completely let go. Notice if you’re doing any unnecessary work here. If you are, gradually let go of that effort.
- Melt the fronts of your hips. See if you can feel the very core of your body, where the psoas lives. Observe what you feel in that deepest part of yourself.
 Christine Malossi, RYT 200 is based in New York City, where she offers a mindful, alignment-focused Vinyasa practice that cultivates balance, awareness, and equanimity. In addition to teaching private clients and group classes at studios throughout Manhattan, she also teaches at the Spencer Cox Center for Health at Mount Sinai Hospital’s Institute for Advanced Medicine where she designs a practice specifically tailored to patients diagnosed with HIV and other chronic illnesses. Christine is honored to be teaching yoga and to have the opportunity to pass on to others the joy and freedom that she has found in her own practice. Find her at www.christinemalossi.com

