Feel Better Every Day: 3 “Magic” Poses

Somebody in my yoga therapy training came up with the term yoga snack. No, it doesn’t refer to a power bar or a small bowl of kitchari. “Yoga snack” is a short, focused yoga practice that you can reach for any time in the course of your day. It’s usually 5 to 15 minutes long, helps you feel better overall, and also addresses some pressing issues.
I am a big fan of yoga snacks, both for myself and my students. Since I became a mom, I squeeze my yoga snacks between my clients—on my lunch break, while my son is reading books on the potty—you get the idea. Some yoga snacks focus on movement, some on breath, some on meditation.
Gone are the days when I could luxuriate for an hour or longer each morning. Time is precious nowadays. The same applies to my clients. We are all busy. So it’s not realistic to expect somebody to commit to an hour of practice every day or even every other day. Five to 15 minutes is much more doable. Is it enough? Well, in the words of my teacher, Gary Kraftsow: “Doing nothing changes nothing, doing something changes everything.” That is the principle I go by.
What Makes a Tasty Yoga Snack?
Now the question is: what do we put into our yoga snack? Contrary to popular belief, it is not advisable to plop into the Kapotasana (Pigeon Pose) without any prior preparation. The yoga snack practice needs to be simple enough to do without any other preparation, versatile enough to be adaptable for a variety of needs and potent enough to make a difference in how we feel.
You might be thinking: “Surya Namaskar (Sun Salutations)! That’s a perfect example of a yoga snack!” For some, it is. For many others, it isn’t. Sun Salutation is not an easy sequence: the jumping back and forth, Chaturanga Dandasana (Four-Limbed Staff Pose), deep forward bends, deep backbends, the stress on the shoulders, the strong pull on the hamstrings. If your body can do it, you will likely benefit from it. If not, you can hurt yourself.
A friend of mine recently threw her back out after a challenging yoga class. She is a lawyer, a mother of three, and an exercise addict—a bit stressed, a bit high-strung, a bit rushed. She could really benefit from yoga, but now she refuses to do it. Her one and only experience with a yoga class: “All those Sun Salutations were killing me! Yoga is just too hard,” and she is a fit 40-year-old! Then what about an older slightly overweight office worker with tight hamstrings and a sedentary lifestyle? The point is, Sun Salutations are not your only, or best, option. Personally, when I need a yoga snack, I reach for my “magic three” yoga poses.
My magic three yoga poses are not fancy, but they are effective, versatile, and potent. Almost anybody can do them, and most people would benefit from them. When students ask me at the end of the class: “What can I do at home?” I usually say: “Start with the magic three, and we can build on that.”
This is also what I do when I feel like I don’t have time, energy, or desire to practice. These poses are easily adapted to the needs of most practitioners, with slight changes in the position of the arms, feet, or head, or by using props, like blankets or a chair. I am convinced that if more people practiced just these three poses, we would have many fewer instances of back pain and neck tension.
The Magic Three Yoga Poses
1. Chakravakasana (a combination of Bitilasana (Cow Pose) and Balasana (Child’s Pose)
If you have no time for anything else, just do this one. I guarantee that after a few repetitions, you will feel different.

Why Do It?
- To articulate the spine (healthy spine, healthy body)
- To move almost every joint in the body in a non-invasive way
- To alternately contract and stretch the upper back, lower back and neck to increase circulation and relieve tension
- To practice progressive abdominal contraction
- To connect to the flow of inhalation and exhalation
- To move the energy throughout the entire system
How to Practice Chakravasana
- Begin in Bharmanasana (Tabletop Pose).
- On an inhalation, lift your chest forward and up, pulling the shoulder blades down and lifting the chin slightly. Don’t let your shoulders move past your wrists.
- On an exhalation, start to move back, gradually contracting your abdomen. Make sure to bring your elbows down first, then move your butt toward the heels.
- Here’s a trick: On your exhalation, do not round your upper back as you would in Marjaryasana (Cat Pose). Think of pulling back with your tailbone, the rest of the body following.
2. Bhujangasana (Cobra Pose)
Whenever I hear my students complain that they’ve spent too much time sitting, standing, biking, driving, lifting, painting—let’s face it, living—I always say, “Do some Cobra.” This one pose offers so many benefits; I cannot comprehend why it isn’t more popular. Well, actually I do know why. Often Cobra Pose is done in such a way that it creates problems rather than resolving them. Sad.

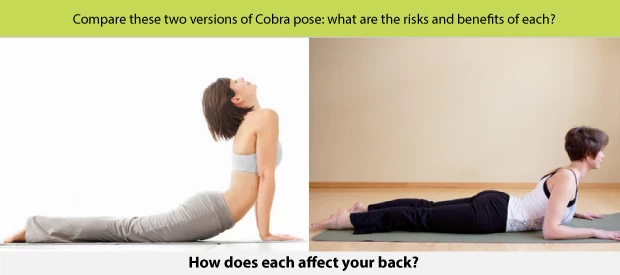
Let’s conduct a quick experiment: Look at the picture below and compare the first and second images. Then read about the benefits that we would expect from Cobra and decide which version will be likely to offer them.
Why Do It?
- To strengthen the upper and lower back
- To stabilize lower back and sacrum
- To strengthen glutes and hamstrings (specific variations of Cobra)
- To stretch hip flexors
- To stretch the chest by widening it
- To stretch and strengthen the neck (certain variations of Cobra)
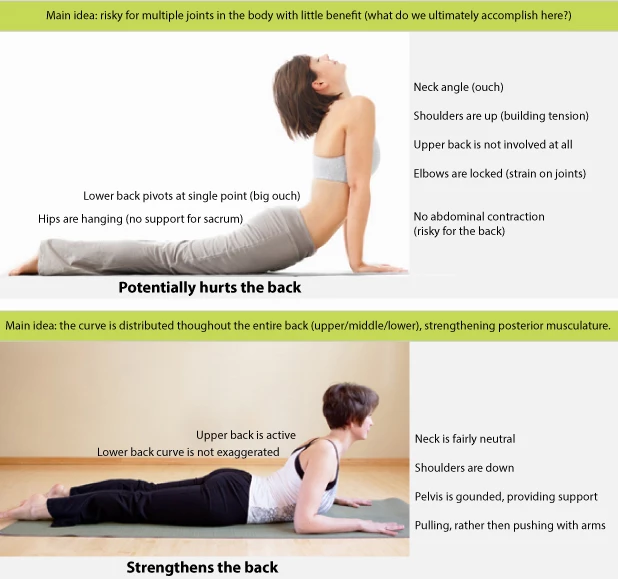
Here is what I see when I look at these two images:

The second image might not look as fancy, but this option is certainly more useful for your back.
How to Practice Cobra
- Lie face down, forearms comfortably on the ground, shoulders relaxed, forehead down.
- On an inhalation, pull slightly back with your hands and lift the chest up, while your head remains in a neutral position.
- On an exhalation, stay up and press your pelvis into the floor, creating a stable foundation.
- As you inhale, keep pulling your chest forward and your hands slightly back, arching your spine from the neck all the way to the tailbone.
- Take 4-6 breaths like that, then come down on exhalation.
- Do not push up with your hands! Once you start pushing, you lose all the potential benefits and start compromising your back.
3. Vajrasana
The effects of this pose are similar to Chakravakasana, but they are amplified.
Why Do It?
- To mobilize the spine (“To mobilize” basically means “to move” to increase circulation to the musculature and lubricating the joints by pumping synovial fluid. It’s essential for
 keeping muscles and joints nourished, healthy and happy.)
 - To alternately contract and stretch the upper back, lower back and neck to increase circulation and relieve tension
- To mobilize the hips
- To mobilize the shoulders
- To practice progressive abdominal contraction
- To connect to the flow of inhalation and exhalation
- To move the energy throughout the entire system
How to Practice Vajrasana
- Start in the Child’s Pose, hands on the lower back, palms facing up, shoulders relaxed.
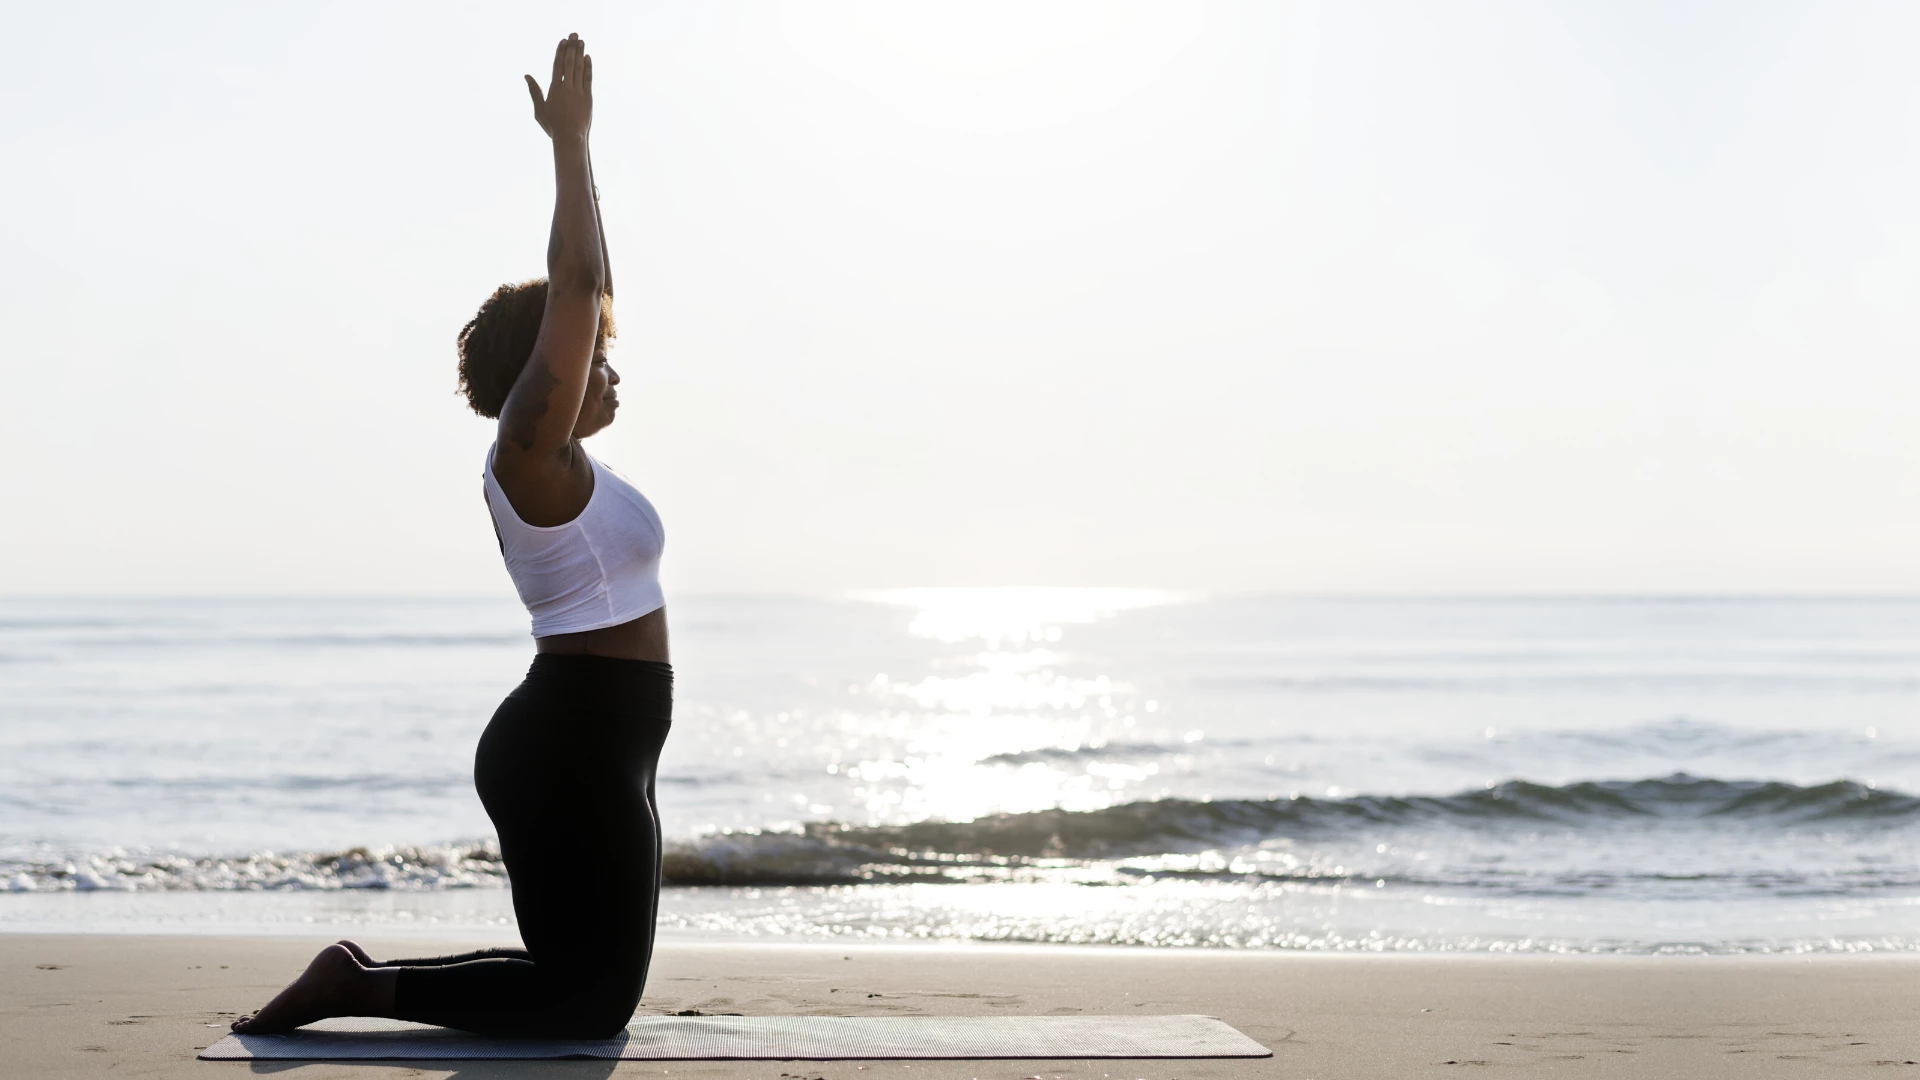
- On an inhalation, lead with the chest as you rise to stand on your knees, sweeping the arms up.
- On an exhalation, gradually contract your abdomen as you bring your chest back down to your thighs and lower the butt toward the heels. Hands return to the back in a sweeping motion.
- On the way down, make sure to avoid taking a “nose dive.” Instead, keep the chest lifted for about half of the way.
That’s it! Sounds doable? Maybe even a little too simple? Don’t let the simplicity fool you. Simple is usually best for new students or those who are just starting to practice on their own. Experienced students can always add other things. Whenever I feel like I don’t have time, energy, or desire to practice, I tell myself: “I’ll just do the magic three.” Sometimes it’s enough to make me feel better; other times it leads to a much longer practice.
I know what you are thinking: not all of my students will be able to get down on their knees. Very true! These folks can do the same poses on the chair. The benefits are just too great to forgo them completely. And to tell you the truth, in my 10+ years of teaching yoga to all kinds of populations, only a handful of students weren’t able to do those initially. Over time, most of them got to the place where they could.
Keep in mind that it’s considered one of the best forms of exercise for older folks to get down to the ground and then get up. It is preferable to practice this skill under supervision. If they ever fall down (which is a big problem for older students), they will be better off if they can get up on their own.
Are These Yoga Poses the “Magic” Solution for Everyone?
Should we make everybody practice those poses? Of course not! Are they useful for most students? Absolutely. Of course, these yoga poses are very valuable by themselves, but they become even more effective when put together with a specific purpose in mind. This purpose can be structural (mobilize the spine), therapeutic (relieve neck tension), energetic (to help wake up in the morning), or mental (to prepare for seated meditation).
Of course, the kind of adaptations you choose and the order you arrange them in is super important. Pose adaptation is one of the most effective tools yoga teachers have to achieve very specific structural, energetic, and mental-emotional effects. For example, check out some of Bhujangasana adaptations:
In addition to lower back strengthening you can choose to emphasize the strengthening of the upper back (1), neck (2), glutes and hamstrings on one side (3), glutes and hamstrings on both sides (4), stabilizing the sacrum (5), strengthening upper back and shoulders (6), strengthening one side of the back (7), strengthening all posterior structures (8)—in just this one pose!
Also, read...
4 Ways to Protect Hands and Wrists in Yoga
Dancer Pose (Natarajasana): Practice Tips And A Beginner Yoga Sequence
Warrior 2: How To Sequence For Healthy Hip Alignment In A Beginner’s Class
Related courses
Need an Energy Makeover? How Yoga Can Help You Boost Vitality
Keys to Finding Inner Strength: A Yogic Wisdom Path to Developing Greater Resilience

Educated as a school teacher, Olga Kabel has been teaching yoga for over 14 years. She completed multiple Yoga Teacher Training Programs but discovered the strongest connection to the Krishnamacharya/ T.K.V. Desikachar lineage. She had studied with Gary Kraftsow and American Viniyoga Institute (2004-2006) and received her Viniyoga Teacher diploma in July 2006, becoming an AVI-certified Yoga Therapist in April 2011. Olga is a founder and managing director of Sequence Wiz— a web-based yoga sequence builder that assists yoga teachers and yoga therapists in creating and organizing yoga practices. It also features simple, informational articles on how to sequence yoga practices for maximum effectiveness. Olga strongly believes in the healing power of this ancient discipline on every level: physical, psychological, and spiritual. She strives to make yoga practices accessible to students of any age, physical ability, and medical history, specializing in helping her students relieve muscle aches and pains, manage stress and anxiety, and develop mental focus.


 keeping muscles and joints nourished, healthy and happy.)